I had the chance to work quite a long time with the TourBox 2020 panel, and now, with the release of the latest version 2.2.1 of the accompanying software TourBox Console, my review is finally ready, so let’s take a close look at this neat device, shall we?
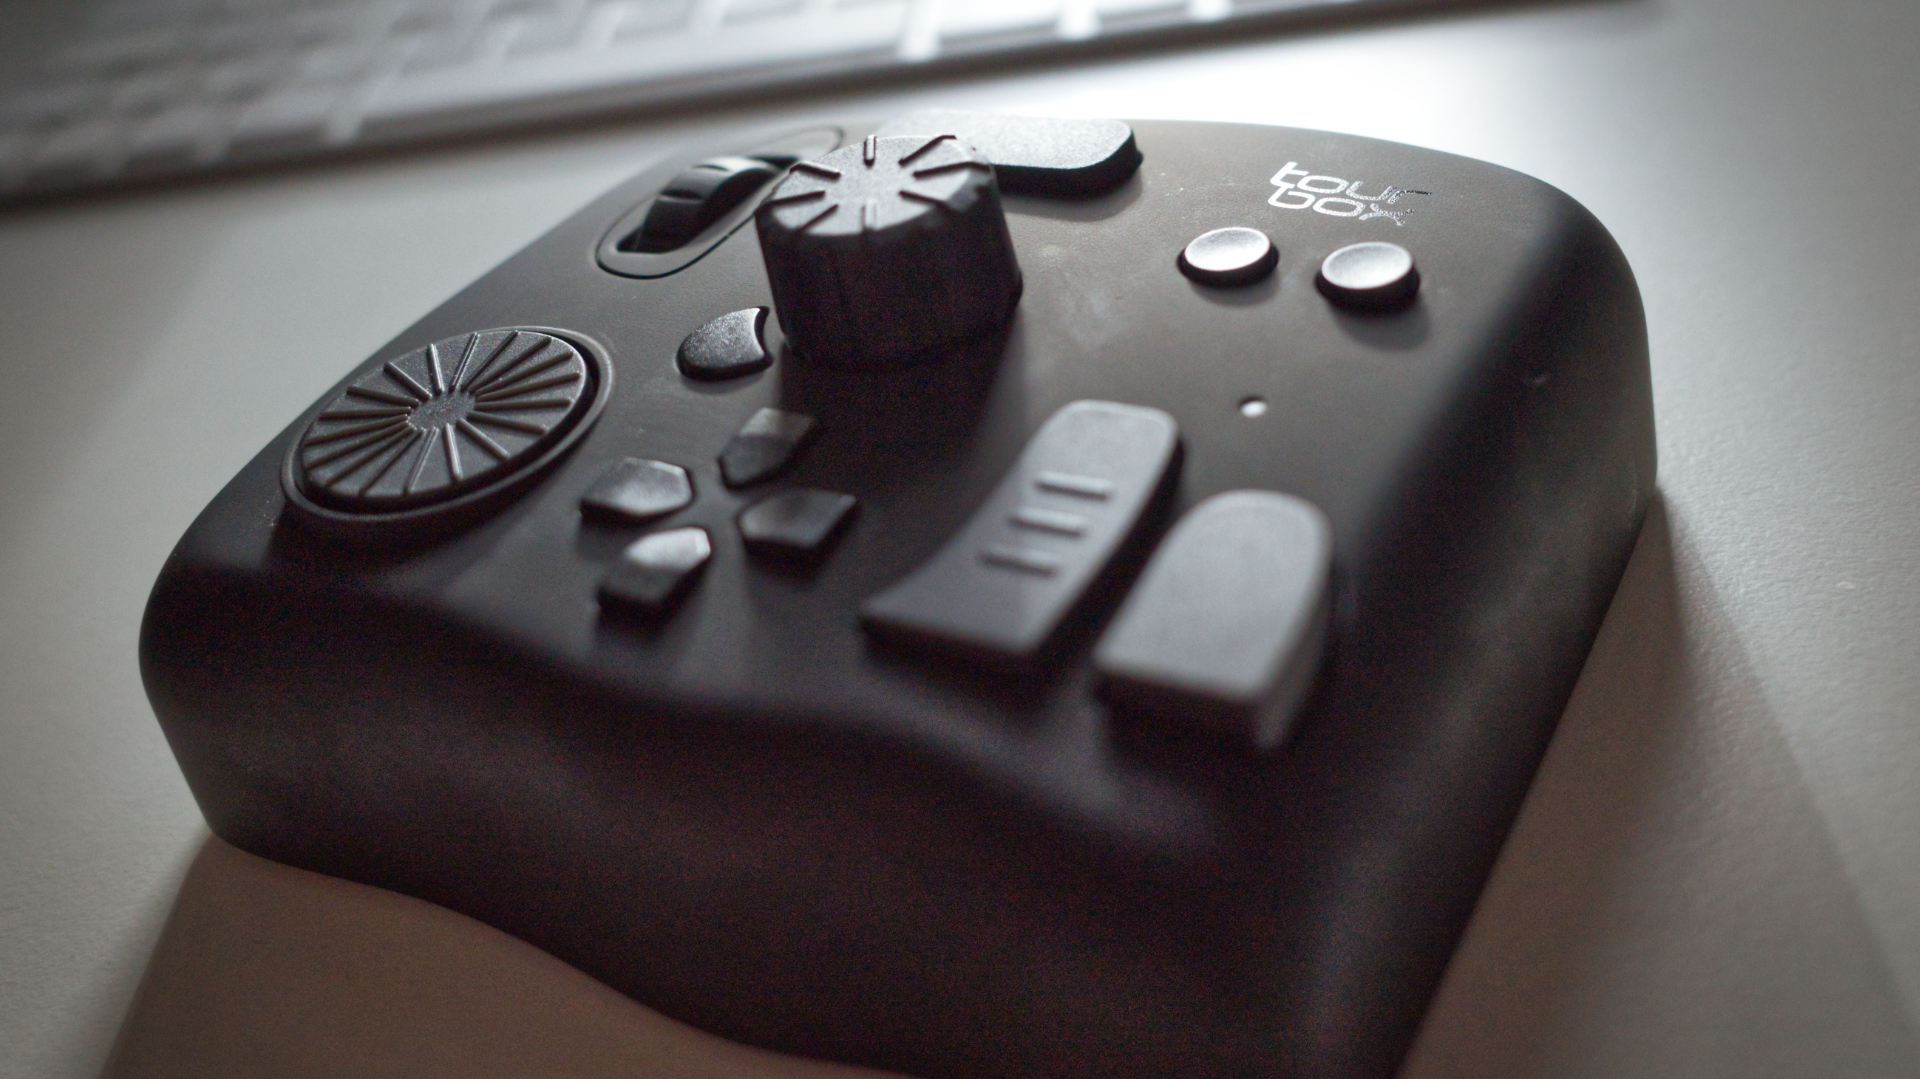
At first glance the TourBox console is a very strange device. It fits roughly in my hand, has an unusually organic shape, a USB-C port on the back and lots of buttons, dials and wheels scattered all over its surface. So what is it exactly?
What is a Control Panel?
What is sitting on my desk here for the last month or so is called a control panel or control surface. Think of a dedicated, specialized keyboard for speeding up your workflow for all kinds of different tasks. Each and every button, dial, knob and wheel can be programmed and customized using the TourBox Console software. Even combinations of multiple inputs are possible.
Basically, TourBox is a second keyboard next to your normal one. It acts just like it but has different input controls for specialized tasks such as a wheel for scrubbing a timeline or a knob for adjusting the size of a brush.
There are plenty of very different control panels out there: Blackmagic Design offers a giant $30.000 surface (and two variants less expensive) for exclusive use with their DaVinci Resolve NLE/FX/Audio/Color suite. Elgato has different variants of their popular Stream Deck on display. And Loupedeck offers several dedicated consoles for Adobe Lightroom as well as the superb Loupedeck CT, reviewed here.

The thing with all these different products is this: Most of them are very specialized products, tailored around one specific application. This is great if you set up a color correction workstation where nothing else than DaVinci Resolve is installed. The DaVinci Resolve Mini Panel along with the Editors Keyboard will serve you well, no questions asked. But these two devices are no good for anything else. A choice needs to be made here.

Moving to more generic surfaces, Elgato’s StreamDeck line of programmable devices, loaded with LCD keys, can handle virtually any application you throw at them. Same goes for the Loupedeck CT. You can create profiles for different apps, auto-switch between them, program each and every detail of the control surface
TourBox Control Panel
TourBox is a bit different. It is simpler and I mean this in a very positive way. Somehow it manages to strip away complexity, helps you develop muscle memory, and since it is a somewhat tiny device, it won’t clutter your desk as much as other surfaces.

Once unpacked, I immediately noticed the weight of the unit, it is not as light as I had anticipated. It’s not super heavy either, but it certainly won’t slip around on your desk once you touch it.

The one thing most noticeable about the TourBox is its unusual shape. It measures roughly 11cm x 10cm (4.33″ x 3.94″) and all of its edges are very rounded and smooth. The surface is covered with a rubberized material which, although nice to the touch, could wear out over time.
Buttons, Dials, Knobs
The unit is meant to be used with your left hand. I developed the habit of having it angled by 45° clockwise although I think most other reviewers and users use it angled 45° counter-clockwise. With my setup, this is how my fingers work the TourBox: Thumb on C1, C2, Tall Button, Short Button, directional pad, Tour Button and even the Dial. Index finger and thumb on the Knob, index finger on the Top Button. Middle finger on the Scroll Wheel (which can be clicked too) and ring finger on the Side Button.

With this “setup” my thumb moves quite a bit of course but for me it works better that way than placing the pinky on the Side Button. The position of that Side Button is bit weird I think and would suggest moving it next to the USB-C port instead but maybe that’s just me.
To pre-empt the conclusion a bit: I think the unique layout of the very different knobs, dials and buttons, each one individually shaped and placed, is the most significant advantage of the TourBox over most other (multi-purpose) control surfaces. You don’t have to remember a single thing, you can feel which button is where. After a few days it’s just muscle memory, really. Although the device looks a bit strange at first sight, well here is the point of it all, and I think it works just great!

Let’s talk a little bit about hardware here. The device itself feels great, it has a good weight and seems to be well made. However, the buttons are a bit too clicky for my taste and the knob and dial could use a good lubrication. They feel a bit too much like plastic and they grind a little. It’s not super bad, but the knob for example doesn’t feel nearly as solid and smooth as the large dial on the Loupedeck CT. The clicking sound of the buttons is somewhat hollow and sounds similar to that of a computer mouse. I would have preferred a somewhat fuller sound. But in the end it’s just the sound, the function itself is flawless.
The Software
TourBox comes with its own dedicated software, called TourBox Console. Installing it on a Mac (macOS Catalina 10.15.7) is a bit weird, since you first need to install a driver and then, in the second step, install the software itself. Also, on at least a Mac, you need to add the software to the accessibility list so that it can “control your computer” (which is a scary necessity for control surfaces to work). In the end everything worked as expected and TourBox Console is ready to go.

The app’s window is divided in three sections, Preset List, Preset Settings and a graphical overview of the unit for reference.
Everything looks clean and most of the functions work really intuitively. One super helpful aspect of the app is that you can click or drag a button on the device to highlight it in the software. This way you are instantly ready to assign any shortcut to a specific button, dial or knob without having to scroll through the entire list each time. Neat!

The unit comes with pre-loaded mappings for Adobe Lightroom, Adobe Lightroom and Adobe Premiere (one for Edit and one for Color workflows). But you can create up to 30 custom presets on your own or you can browse the quite extensive library of community presets over at tourboxtech.com. You’ll find presets for Affinity Photo, Final Cut Pro, Capture ONE, DaVinci Resolve and even for Chrome!
Everything is customizable. You can map keystrokes, key combinations such as CMD-ALT-x or a left click on the mouse or SHIFT-MouseScroll Reverse, anything you like.

Furthermore, combinations of different keys are possible, too. Tall Button + C1 could refer to a different shortcut that just the Tall Button. The TourBox Console offers a few neat tricks to make this possible: You can tell a button to only send the command after releasing that button. That way the software can distinguish between a press on a single button and a combination of two buttons.
Let me give you an example: In Premiere the Tall Button could set the timeline zoom to 100%. The Tall Button in combination with C1 zooms in, and together with C2 it zooms out. You can even set it to be continuous if you keep pressing the button(s). The Tall Button is set to only send the “zoom to 100%” command when realeased so it won’t set the zoom to 100% the second you press it although you wanted to zoom in using the Tall Button together with C1. All this really works flawlessly und very smoothly. Well done!

Working the software is really a joy since it’s so easy to understand. Programming the unit can be a bit tedious of course but you only have to do it once. It can be set to auto-switch too the application you’re running and it offers an opaque overlay of the Dpad so you can see which tools or shortcuts are mapped to it. I personally barely used that HUD overlay but if you need it, it’s there.
Working with TourBox
Working with this TourBox console really sped up my workflow. Such a tiny device makes quite an impact on my daily routines. Working a timeline in DaVinci Resolve, editing photos in Affinity Photo for CineD. Everything works very smoothly and most things I can do without touching the mouse and search for controls on the screen. Editing a photo, cropping it, retouching it a bit becomes very fast and easy using the TourBox and a mouse. Working with NLEs, especially with the newly introduced Adobe Premiere preset lets me work with just the TourBox and my keyboard, I barely have to reach for the mouse.

The best thing, and I have said it before, is the size of the unit and the fact that each button is uniquely shaped and placed. Muscle memory all the way. The Loupedeck CT may be more powerful and much more versatile in a way but the ease of use of the TourBox is yet to be beaten.
Pros: Great size and weight, perfect for traveling. Intuitive layout, almost perfectly placed controls. Ergonomic shape and nice to the touch. TourBox increased my workflow significantly without a steep learning curve at all. Just work with it for a little bit and you’ll find yourself right at home. The software is great, very intuitive and easy to use. Set it up once and forget it. No manual needed

Cons: Buttons are a bit clicky and the dial and knob feel a bit cheap. The soft-touch coating might wear out over time. It’s USB-C only, no Bluetooth. This might be a nice upgrade for future iterations. The placement of the Side Button seems a bit odd to me.
Conclusion
This control surface is one to keep. It is easy to use and yet powerful in its functions. You really don’t even need to look at it in order to use it. Since it takes up very little space on your desk, it disappears somewhat, but still helps you speed up your workflow. It is really this simplicity that makes TourBox very appealing to me. The ability to create presets for almost any application you can imagine is super helpful and the built-in presets work great, I never had any issues with them.

Of course the pre-programmed presets have deeper functionality than the custom presets because TourBox could use Adobes API to access advanced tools like “HighlightTint.Y” for example, but I think that over time they will add more presets wherever they get access to the corresponding APIs.
All in all I was a bit sceptical when I started working with the TourBox panel but the oddity is its biggest strength, really. It’s super versatile, tiny enough to take with me everywhere and powerful enough to get the job done.

The Tourbox control surface sells for $169 but TourBox tech was nice enough to provide us with a coupon code with which you, our valued readers, can purchase a TourBox 2020 panel for $10 off. Just use the coupon code TB20201117NL on checkout over at their store.
Link: tourboxtech.com
Full disclosure: TourBox Tech sent me a TourBox at no cost. However, they did not ask for a particular opinion or anything other than my own thoughts about it, nor did they pay any money for this review.

What do you think? Might the TourBox something you would consider to try? Share your thoughts in the comments below!




![10 Instagram Trends You Need to Know in 2021 [Infographic]](https://www.socialmediatoday.com/user_media/cache/af/84/af84f7126bc7d8d3f4b5c1b8f8d8ad95.jpg)
