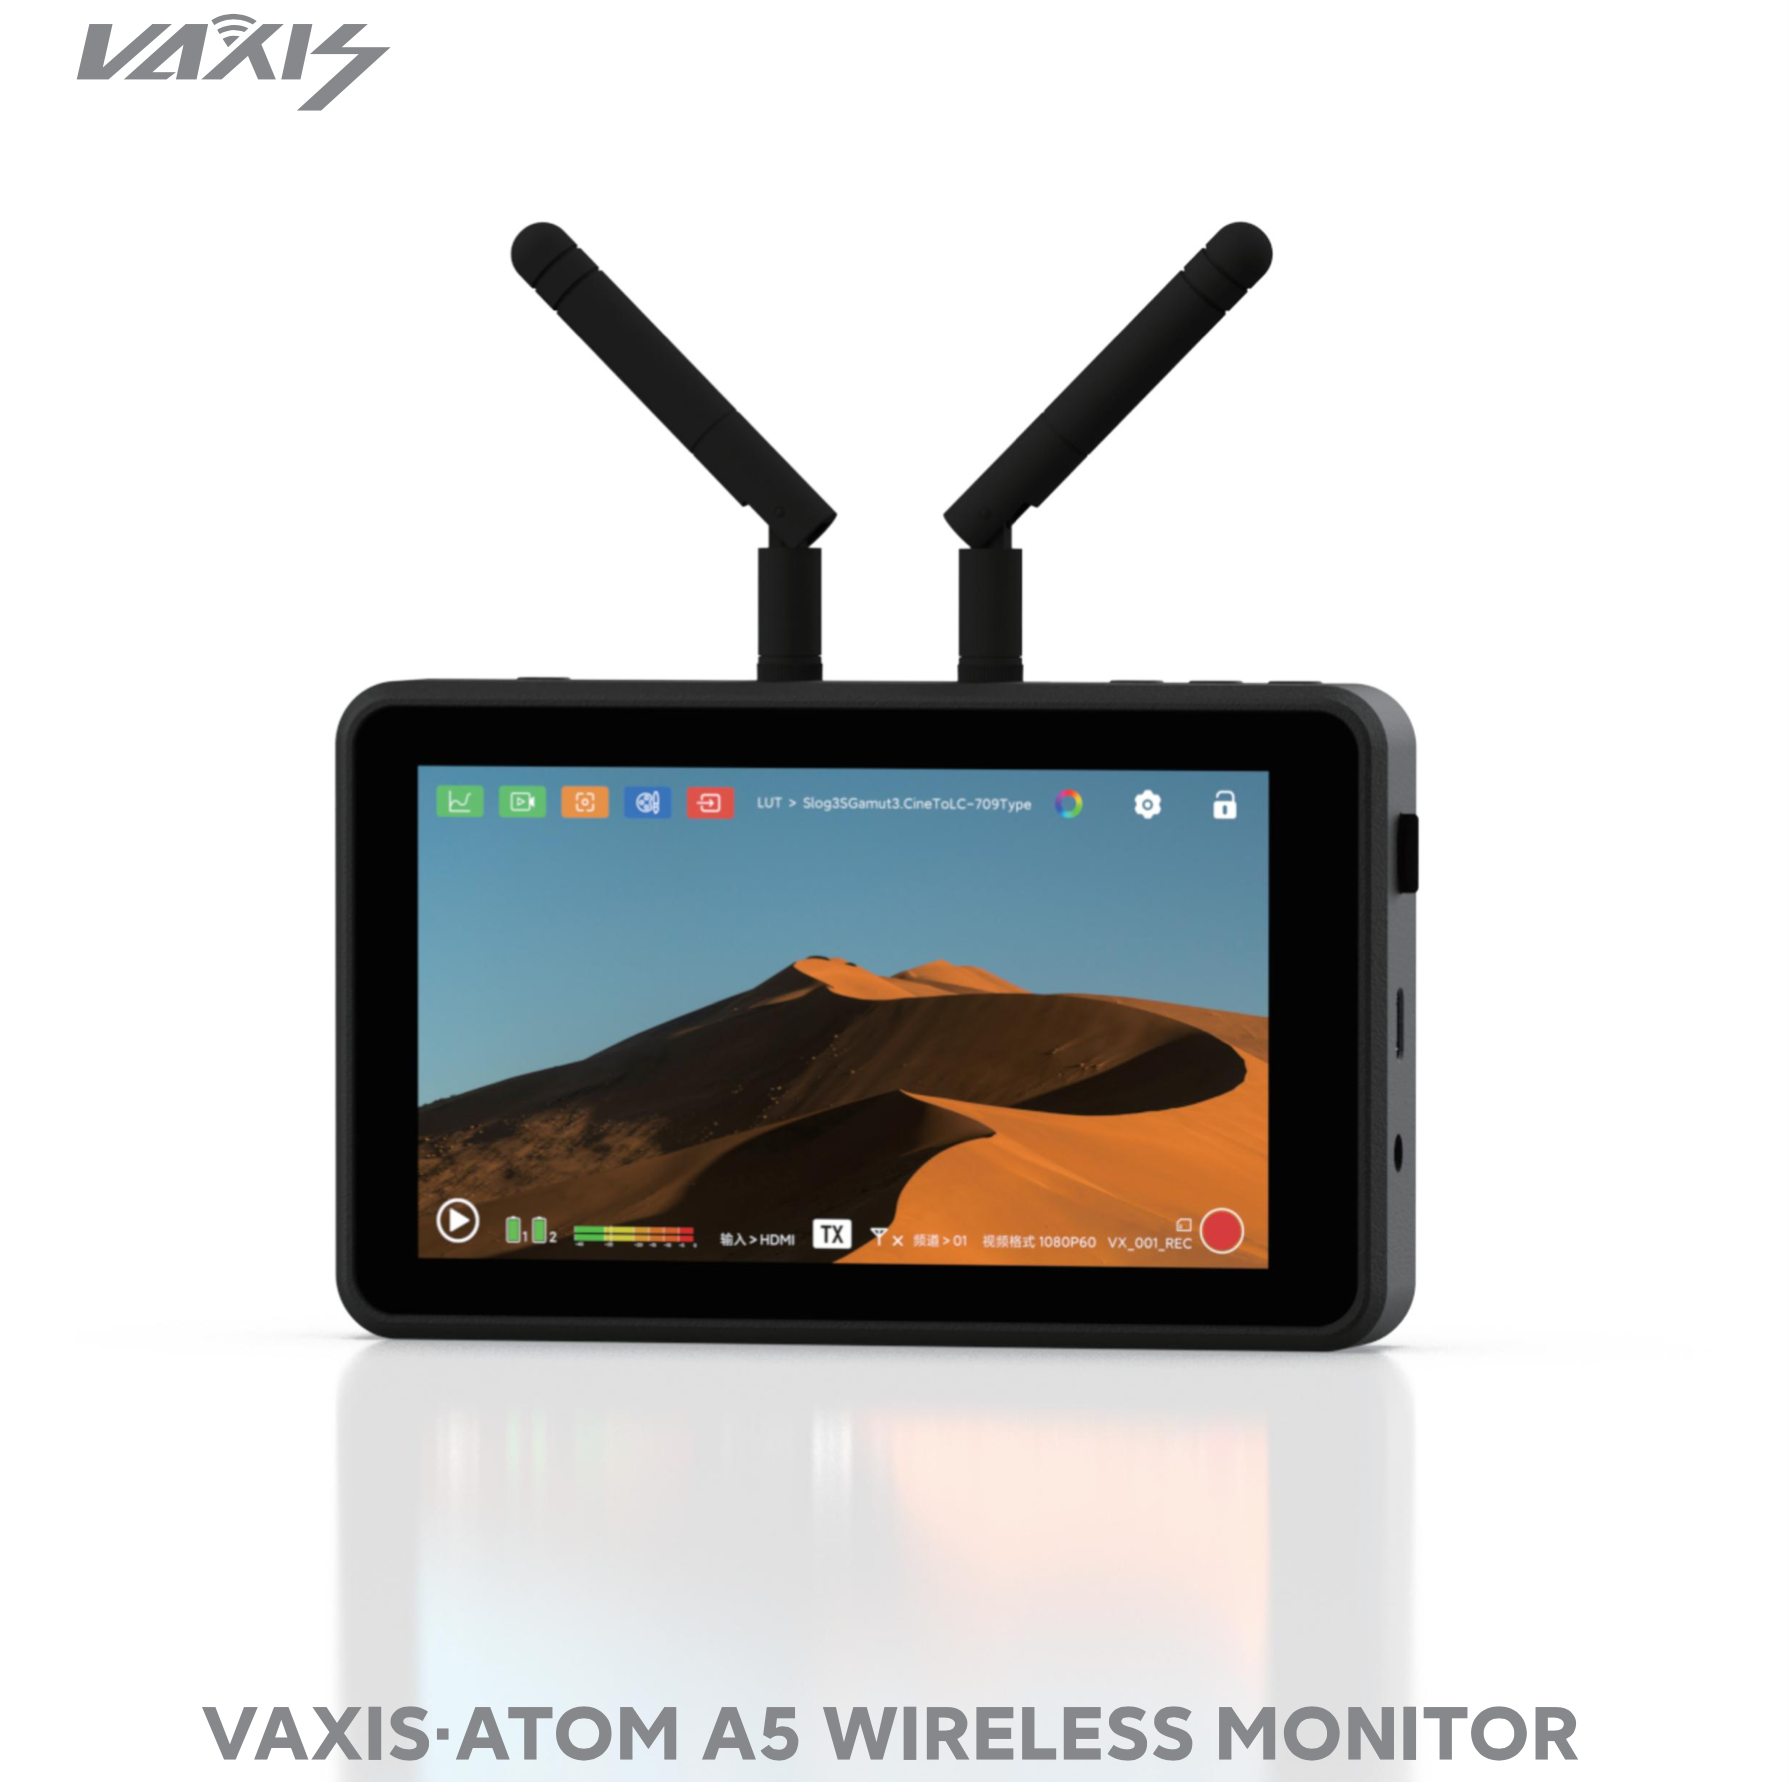
The new Vaxis Atom A5 5.5″ touchscreen wireless monitor is an upgraded model of the A5H. You can use one A5 as a TX unit and then up to two other A5 monitors as RX units. If you use it as an on-camera monitor you can transmit images simultaneously to up to three mobile devices.
Concept
The concept is pretty simple. It was designed to be an on-camera monitor that can also transmit wireless video to two other monitors while also simultaneously sending signals to up to three smart devices.

The Atom A5 also has the ability to be used as a wireless TX or RX unit. All you have to do is choose how you would like to configure it in the menu.
The Vaxis Atom A5 is in direct competition with the Shimbol ZO600M 5.5″ Wireless Video Transmission Device that I have previously reviewed on the site. Both the Vaxis and the Shimbol feature very similar functionality.
In a lot of ways, the Atom A5 looks quite similar to monitors such as the Atomos Ninja V and Ninja V+.

The competing Shimbol ZO600M 5.5″ Wireless Video Transmission Device looks slightly differnt from the Vaxis Atom A5 as it features internal and not external antennas.
The whole philosophy behind the Atom A5 is convenience. By integrating wireless into a small-sized monitor you take away some of the pains of traditional wireless monitoring. You only need to power one device, don’t need to mount one product to another and you don’t need to run any additional cables. By keeping things simple, it allows filmmakers to spend more time actually creating, instead of worrying about equipment.
We have seen quite a few companies bring out affordable wireless monitoring solutions in the last few years. This has made it increasingly easier for anyone on a budget to purchase a wireless monitoring solution without having to spend a lot of money.

Integrated wireless video is nothing new and SmallHD and Teradek have been doing it for a very long time, however, their products are aimed at a different segment of the market.

Another budget option that competes with both the Vaxis and Shimbol offerings is the Crystal Video Technology Swift Z 5.5″ HDMI 1080p Wireless TX/RX Dual-Monitor Kit which I have also previously reviewed on the site.
Key features
- 5.5″ touch screen monitor
- 1920 x 1080 resolution screen
- 1000nit brightness
- 1000:1 contrast ratio
- HDMI input and output
- Built-in wireless TX or RX
- Wide range of monitoring tools
- DC input & DC output
- Compatible with Vaxis Atom500
- Viewable on up to 3 devices using the Vaxis Vision iOS or Android App
- 182.88m / 600ft range
Who is it aimed at?

The Atom A5 is clearly being targeted at users who are looking for an affordable all-in-one wireless monitoring solution, with the added versatility of being able to use it as a stand-alone monitor. This could mean anyone from people starting out on a budget, right up to seasoned professionals.
Shooters working on high-end factual productions will often get requests to provide a wireless monitoring solution as part of their kit. My go-to solution is usually the SmallHD Cine7 500 TX and a SmallHD Focus 7 Bolt 500 RX. However, you can get by with a lot more affordable solutions depending on the requirements of the production.

Occasionally I will also use Wi-Fi-based TX units such as the Accsoon CineEye 2S Wireless SDI/HDMI Video Transmitter that can send signals straight to multiple mobile devices.
As I already mentioned, one of the advantages of udsing something like the the Atom A5 over a traditional wireless device is that you can also use it as an on-camera monitor whenever you don’t need to provide a wireless video system. This is likely to make it more appealing than a stand-alone wireless system.
This is not their first rodeo

This isn’t Vaxis’s first attempt at making integrated monitors with wireless capabilities. Back in 2019, they released the Storm Focus 058 which I reviewed on the site. While the concept behind that product was good, the execution was poor, and I personally found that the monitor wasn’t up to the job and it lacked any type of decent operating system or monitoring tools.

They then released the Atom A5H, which for reasons unknown, was quickly discontinued. I reviewed the Atom A5H on the site and while it was a decent enough offering, there were areas where I thought it could be improved.
Early last year they also announced the Cine8. You can read the review of the Cine8 here. The Cine 8 was a pretty good solution, but that is being targeted at the higher end of the market and not at the same audience as the Atom A5.
Build Quality

The build quality of the Atom A5 is very good. I personally found it to be fairly comparable to a Atomos Ninja V or Ninja V+. In my opinion, it is a lot more solidly made than most 5″/5.5″ budget monitors with integrated wireless that I have come across.
Vaxis has made the entire casing out of metal and it feels a lot more robustly made than their previous A5H.
The buttons are reasonably tactile and the battery plate locks down batteries securely.
Weight & Size

Vaxis lists the weight of the Atom A5 at 480g, however, I decided to weigh it myself and I found that the actual weight was closer to 430g / 15.16oz. This is pretty heavy for a 5.5″ sized monitor, even one with wireless. I think the weight has a lot to do with the build quality and the fact that the Atom A5 features a full metal body construction.
As a weight reference, the Shimbol ZO600M 5.5″ Wireless Video Transmission Deviceweighs in at 300g / 10.14oz, and the Atomos Ninja V weighs 360g / 12.7oz.
What you also clearly have to remember is that you need to power the Atom A5 and once you add two Sony NPF batteries on the back, the overall weight is going to make some smaller camera setups a lot heavier.
Screen

The A5 utilizes a 5.5″ 1920 x 1080 resolution screen with a claimed brightness of 1000nits and a contrast ratio of 1200:1. As a comparison, the Shimbol ZO600M 5.5″ Wireless Video Transmission Device also uses a 5.5″ 1920 x 1080 resolution screen with a claimed brightness of 1000nits and a contrast ratio of 1200:1. For another comparison, the Atomos Ninja V has a 5″ 1920 x 1080 resolution screen with a brightness of 1000nits.
As far as the image controls are concerned, you can choose from the following options:
- Brightness
- Contrast
- Saturation
- Sharpness
All of these parameters can be adjusted from 0-100. In their default settings, there are all set at 50, except sharpness which is set at 7.

There is also the ability to do RGB and RGB offset adjustments.

You can also adjust the Backlight, but for some strange reason, this is found on the Setting page and not the Display page.
You can also adjust the color temperature of the display to 5600K, 6500K, or 9600K. There is also a User option, but when you select it nothing happens, and no options appear.

There are anamorphic de-squeeze viewing options for:

Now, I did discover some issues when testing the Atom A5. If you turn on one of the anamorphic de-squeeze options and then select scopes or try and zoom in on the image it automatically turns the anamorphic de-squeeze off! This same problem also occurs if you do a pinch to zoom on the screen.

Aso when viewing an anamorphic de-squeeze image, if you turn the peaking on for some strange reason it shows up on the top edge of the screen.
This makes using this product with anamorphic lenses very difficult.

You also have the ability to set frame markers, safe areas, and center markers.

I also found a bug that on occasion if I selected center marker the screen suddenly started displaying a weird pattern, even with no camera connected up.

You can set 5 different LUTs as presets and you can also load up your own LUTS. Just to be clear there are no preset LUTS loaded up as standard on the monitor.
The monitor also features the usual exposure and focus assist tools such as:
- Histogram
- Waveform
- Vectorscope
- Monochrome
- Image Zoom
- Peaking
- Safe Area
- Zebras
- Center Mark
- Image Flip
- Mirror Image
- Image Freeze
- Image marker
- Point to Point
- Scanning Mode
- False Color
The trouble with most of the image assist tools such as waveform, vectorscope, histogram, etc. is that you cannot move them around on the screen or change their size. You can also only select to have three on at once, even though there are four.

You can, however, have multiple tools selected at once. However, with the video scopes, you can also only select to have three on at once, even though there are four.
The peaking can be set to red, blue, green, or grey and you can adjust the sensitivity.

With the image zoom you can choose from:

When you use two fingers to do the image zoom you can also move around the screen once you are zoomed in.
With the zebras, you can choose to set a minimum and maximum threshold which is handy.
With False Color, you can see a color scale but there aren’t any IRE markings, except for 0 and 100, and I have no idea what camera the false-color scale is based on. So many companies making monitors just can’t seem to get false color right.
The touchscreen response is very good on the monitor and it is a lot better than previous touchscreen Vaxis monitors that I have tried.
HDR?

The Atom A5 does feature an HDR setting, but there is zero information about what this is supposed to replicate. I found that if you turn the HDR setting on, all it seemed to do is make everything look brighter.
The Atom A5 is claimed to reach 1,00nits, but it doesn’t do so dynamically as to technically meet the HDR spec (for contrast ratio). However, it can still be used to monitor HDR, but I would say this is more of an HDR simulation than anything else.
A lot of experts will tell you that on the monitoring side, relying on the picture alone, even a true HDR picture in anything other than a studio environment is not ideal and would result in improper exposure adjustments since the perceptions of what is on screen changes so drastically along with the viewing environment. For example, if you are monitoring on a bright sunny day, any subtleties in the darkest areas of an HDR picture won’t be able to be seen by the eye.
In this methodology, reliance on exposure tools and scopes is even more important than before when speaking of HDR, because, in a proper viewing environment, any issues at the extremes of a camera’s dynamic range get magnified much further than with SDR.
Control
The Atom A5 has the following physical buttons:
- Power On/Off
- Three Functions buttons (F1,F2,F3)
The function buttons and the power on/off are all located on the top of the monitor.

The function buttons are not programmed to do anything out of the box.

You need to manually set them in the menu.
Cool Runnings

The Atom A5 doesn’t feature any fans like its predecessor the A5H. One of the complaints I had with the A5H was that the fans were quite loud and I found them to be noisier than those on the Atomos Ninja V.
It seems as though Vaxis listened to my feedback, and probably feedback they got from others, that the fans were too loud and they needed to change the design.
The Atom A5 runs completely silently which is good news, but does it get hot because it isn’t using any fans?
I left the Atom A5 on for a few hours to see how hot it would get and while it does start to get quite warm. After about an hour it was getting to the point where I couldn’t hold it in my hands.
Inputs/Outputs

The Atom A5 has the following inputs and outputs:
- HDMI In
- HDMI Out
- 3.5mm Headphone Out
- DC In
- DC Out (8.5V / 0.6A)
- USB-C Port
- Micro SD card slot

The inputs and outputs are all located on the left-hand side of the monitor apart from the USB-C and Micro SD card slot, they are on the right side.
The DC Input is located on the bottom of the monitor.

The HDMI ports are not countersunk, so there is no protection from knocks or breakage. This seems to have become the common standard and almost every manufacturer of small-sized HDMI monitors are doing the same thing.
Mounting Points

There is only a single 1/4-20″ thread on the bottom of the Atom A5. This doesn’t give you many options for mounting, but as the Atom A5 has antennas on the top there isn’t any space to put another mounting point on the top of the monitor.
Accepted Inputs

The Atom A5 can receive the following signals over HDMI:
- 1920 x 1080p 23.98/24/25/29.97/30/50/59.94/60
- 1920 x 1080i 50/59.94/60
- 1280 x 720p 50/59.94/60
It can output the following signals over HDMI:
- 1920 x 1080p 23.98/24/25/29.97/30/50/59.94/60
- 1920 x 1080i 50/59.94/60
- 1280 x 720p 50/59.94/60
Audio Monitoring

On the Atom A5, there is a decent-sized audio level display but there is no way of changing what channel you are listening to.
Antennas

Unlike the previous A5H which featured in-built antennas, the Atom A5 has two external antennas.
Power Draw
The Atom A5 can be run from one or two Sony-style NP-F batteries or through the DC input. Vaxis doesn’t list what the power draw of the Atoms A5 is.
Boot Up Time
I found that the boot-up time for the Atom A5 was around 11 seconds. This is a little slow and you need to factor this in if you suddenly have to do something in a hurry and have to turn the monitor on from scratch.
In saying that, most competing systems have a similar boot-up time.
Form factor & Usability

If you are going to build a product that is designed to be used on a camera and/or as a standalone director’s monitor then it not only has to be functional but also easy to use.
The Atom A5 features a pretty basic design like most monitors this size, although it is a little heavier. This does mean that it may not be suitable for use with small-sized mirrorless hybrid cameras because you will be adding a lot of weight to the top of the camera.

If you are using the Atom A5 as an RX unit there is nowhere to mount handles or even attach a strap, so if a director or other member of the crew is using it they just have to hold it bare bones.
This does make it difficult to hold and use. I am not sure why Vaxis didn’t at least include a lanyard and attachment point so someone can put it around their neck.
If you leave the Atom A5 on for extended periods of time it will get hot and no one wants to hold onto something that is warm (unless you are working in cold conditions!).
The Atom A5 is pretty straightforward and easy to use once it has been set up. The operating system is an improvement over the previous A5H and the screen quality is also better.
Recording

One of the nice features of the Atom A5 is that it does feature onboard recording. This is done in the MP4 format in HD up to 60p to a Micro SD card. The slight caveat is that a single file is limited to a size of 4GB. You can also choose to change the name of the recording, but the options are quite limiting.

Above you can see what type of file gets recorded. It is an H.264 YUV420 file with a pretty low bitrate of 8.38MBit/s.

There are no real options when doing the recording. On an Atom A5 you can just press record and you will sea red box come up around the screen to indicate that it is recording.
When you activate the recording functionality you lose the ability to access or use any monitoring assist tools. The only exception to this is if you had monitoring tools enabled before going to the record section. If you did, they will stay up on the screen, but you can’t turn them off.

You can press a Play button icon on the scren to play any recording back.
You shouldn’t confuse this recording capability with a dedicated monitor/recorder because its capabilities are pretty limited. However, it is a great way to record footage so someone can quickly play it back and have a look at a shot. The quality of the recorded image is actually not too bad. If you wanted to use it for a social media posting it would work well.
Wireless Plug & Play?
Setting up the Atoms A5 to use the wireless functionality wasn’t very straightforward. Vaxis doesn’t provide any instructions and it took me a long time to connect two A5 monitors. Companies really should provide crystal clear instructions and not leave it up to the end-user to work out.
Conversely, connecting up to the Vaxis VisionApp so that you can view images on your smartphone is very easy to do. All you need to do is to choose the generated WiFi network on your smartphone and then open the Vaxis Vision app. An image gets displayed straight away.

On the TX unit you can select what channel to use and then any RX device will then automatically switch to that channel.
Vaxis didn’t include any instructions for linking up the Atom A5 devices. The last thing anyone wants to do is to be stuffing around trying to connect up wireless devices. I reached out to Vaxis and they told me that they will be including better instructions with the shipping versions.
The good news is that once you pair the devices for the first time, you don’t have to do it again unless you change their operating status from a TX to an RX, etc.
Latency
I tested out the Atom A5 to see how much latency there was between the two units and between the TX and smartphone app.
From my tests, I found that the average latency between the TX unit and the RX unit was 171ms. The average latency between the TX unit and the Vaxis Vision app was 40ms.
How does this latency compare to other similar systems that I have tested? Below you can see:
| LATENCY (TX to RX) | |
| Vaxis Atom A5 | 171ms |
| Shimbol ZO600M | 147ms |
| Vaxis A5H | 119ms |
| CVW Swift Z | 141ms |
I then tested the latency between what is being seen on the camera’s monitor (using the Atom A5 as the TX) and what is being seen on the Vaxis Vision App. I found that the average latency of a series of three random tests was 97.33ms. This latency was quite a bit better than the latency when using two Atom A5 monitors.
How does this latency compare to other similar systems that I have tested? Below you can see:
| LATENCY (App) | |
| Vaxis Atom A5 | 40ms |
| Shimbol ZO600M | 97.33ms |
| Vaxis A5H | 50.33ms |
| CVW Swift Z | 182ms |
What do these figures actually mean? Well, anything below 100ms is considered to be low, because most humans don’t perceive a delay that small. Once you get over 100ms we perceive a noticeable delay.
Above you can see a real-world latency test showing the difference between the Atom A5 that is set to TX and another Atom A5 set as an RX and the Vaxis Vision App on an iPhone. The TX unit is on the right, the RX unit on the left, and the iPhone is at the top.
The latency from the RX to the Vaxis Vision app was excellent, especially for a Wi-Fi-based transmission system. The latency from the TX unit to the RX unit was way too high for my liking.
Vaxis Vision App
I really wish Vaxis would fix their app. It is pretty poor as far as wireless viewing apps are concerned. There is very few image assist tools available and you can’t even few a clean image on the screen. I have mentioned this in every Vaxis review and they still haven’t changed it. I am afraid to say that it is one of the worst viewing apps I have used.
The app is straightforward and easy to use and all you need to do is to connect to the generated Wi-Fi network and open the app.

Once you connect to your device you will see the image from your camera straight away.

You can choose various levels of image zoom and you can move the selected zoom area around by dragging the position of the yellow box around.

You can turn on/off peaking and also adjust the intensity of the peaking, however, you can’t change the color. You can also select zebras as well. With zebras, you can adjust the threshold from 50-100%.

The app also lets you adjust brightness, contrast, and sharpness.

You can also bring up a greyscale, center mark and put up several frame-safe boxes.
The Vaxis Vision app does have the ability for you to take still images or record low-resolution video directly to your smart device. If you want to record clean images you need to turn your camera’s overlays off on its output.
The app doesn’t allow you to use LUTS, there is no waveform, vectorscope, histogram, or false color option available. My biggest complaint is that you can’t even view a clean screen without all of the overlays.
The Vaxis Vision app does leave a lot to be desired. I am sure that this is something that could be fixed, but I have now mentioned it numerous times to Vaxis and nothing has changed.
Is the screen bright enough?

As I have already mentioned, the Atom A5 is claimed to feature a 1,000 nit daylight viewable screen.
You can change the brightness levels of the monitor as well as contrast, saturation, and sharpness. You can also make RGB adjustments and do RGB offsets, but you have to be very careful when doing this.
I personally think that 1,000 nits are slightly less than what I would consider being daylight viewable. I really think you need a screen with at least 2,000 nits minimum to make that claim.

I actually found that in real-world use the screen was reasonably good outdoors, but you may struggle to see it in very bright sunlight. Like most monitors, it is quite reflective and hard to see if it is viewed from a particular angle.
Just like higher resolution doesn’t always equate to a better camera, higher nits don’t always equate to a better monitor. Too often I have seen monitors that have high nits, but look horrible.
The panel is listed as 8-bit with 10-bit scopes. A lot of companies list their monitors as 10-bit even though they are really using a 10-bit (8+2 FRC) panel. FRC stands for Frame Rate Control Technology and an 8+2 FRC panel is basically a way of trying to approximate the color reproduction of a true 10-bit panel. A true 10-bit monitor can display 1024 shades of color, whereas a 10-bit (8+2 FRC) panel can only truly display 256 shades. So what a 10-bit (8+2 FRC) panel does is artificially create in-between shades of color by quickly shifting the pixels to go between certain shades of colors.
For example, you would show the main shade of one color for 75% of the time and then another one for 25% of the time. This creates an illusion for the viewer that they are actually seeing more colors than what can actually be displayed.
Image quality

At the end of the day if a monitor can’t display accurate images then it doesn’t matter how many bells and whistles it has.
The picture quality is reasonably good on the Atom A5, however, I did find that it leans a little green. I actually found that if I went into the settings and changed the display’s RGB offset to -10 Green it looked better.
-

Vaxis Atom A5 -

Atomos Ninja V
Above you can see an image comparison between the Atom A5 and Atomos Ninja V. The Vaxis doesn’t have as much contrast as the Atomos and overall the Atomos image looked more neutral. The Vaxis does have the ability to change RGB and RGB offset values so you could dial it in to look better.
-

Vaxis Atom A5 -

Shimbol ZO600M
Above you can also see a comparison between the Atom A5 and the Shimbol ZO600M 5.5″ Wireless Video Transmission Device. Although it’s hard to really show the difference with a couple of still images, the Vaxis leans slightly green, while the Shimbol leans slightly magenta. Both monitors have the ability to change the RGB and RGB offset values, so you can correct this.
The trouble with trying to evaluate any monitor’s image quality is that it is very subjective. What one person may think looks good, another may think it looks terrible. For me personally, I want the monitor to match as closely to what I am seeing in my camera’s EVF.
Does accuracy really matter?
This may sound like a ridiculous question to ask, but with everyone watching content on different screens and types of screens, it’s a legitimate question.
Just because you are basing color accuracy, brightness, and contrast off whatever monitoring or grading monitor you are using there is very little chance that it is going to be seen by someone as intended unless it happens to be shown in a movie theatre (and even then there is still variables).
In the case of giving a monitor to a director, producer, or client, does it really need to be super accurate? That answer is really going to depend on the level of production. For me personally, I would rather try and provide the best image possible so that a director, producer, or client knows exactly what they are getting. I found that the image from the Atomos A5 was an ok, but not a great representation of what I was seeing on my camera.
Is it actually 1,000 nits?

To check the claimed brightness of the Atom A5, I shot a white card and then exposed the image so it was just below 100% so there was no clipping. I then took a reading from the Atom A5 using a Sekonic C-800. The Atom A5 has a claimed maximum brightness of 1,000 nits so does it produce 1,000 nits?
The Atom A5 gave me a reading of 1210 lux. This was with the backlight set to 100.
Conversely, the older A5H which this replaced gave me a reading of 796 lux was well below Vaxis’s figure of 1,000 lux.
| BRIGHTNESS | |
| Vaxis Atom A5 | 1210 lx |
| Shimbol ZO600M | 1000 lx |
| Vaxis A5H | 796 lx |
| CVW Swift Z | 259 lx |
Above you can see what the brightness was for competing products I have tested.
As another comparison, I measured the Atomos Ninja V at the exact same time and I got a reading of 960 lx. In terms of brightness, the Vaxis Atom A5 was very comparable to the Atomos Ninja V, however, the Ninja V is better at showing blacks.
Wireless performance
This is always a hard one to review and test. Wireless range and performance depend on where you are using it. In one location you may get 600′ of range or more, and in another, you may be lucky to get 50′. From my testing here in Japan, I found the wireless range to be very good. Again, I need to stress that wireless performance very much depends on the environment you are using it in.

I found that I could get up to 350m / 1,148′ and still get a signal. Now, even though I could achieve that distance, which far exceeds the 182.8m /600′ range that Vaxis claims, you won’t get a consistent stable signal. I found that up to around 100m / 328′ the signal is reasonably stable, anything over that and the stability of the signal will get compromised.
The range I got was still impressive, despite the signal not always being stable.
So how does this range compare to other similar systems I have tested? Below you can see:
| DISTANCE | |
| Vaxis Atom A5 | 350m / 1,148′ |
| Shimbol ZO600M | 76.8m / 252′ |
| Vaxis A5H | 100m / 328′ |
| CVW Swift Z | 230m / 754′ |
The Vaxis Atom A5 has a far greater range than any comparative system I have tested. In saying that, the stability of the signal is more important than the max distance, and in that regard, most of these systems are a lot closer than they may appear to be on paper when you use them in the real world.
What is very apparant is that it seems to make a big differnce if the system you are using has external or internal antennas. The Vaxis Atom A5 and CVW Swift Z both have internal antennas, hence the greater operating range.

When I was using the Vaxis Vision app, I could also get up to 350m / , however, the signal was very inconsistent and not stable at all. I found that up to about 30-40m away it was reasonably stable, anything over that and it will constantly drop out or freeze.
So how does this range compare to other similar systems I have tested when using an app for viewing? Below you can see:
| DISTANCE | |
| Vaxis Atom A5 | 350m / 1,148′ |
| Shimbol ZO600M | 85m / 279′ |
| Vaxis A5H | 30m / 98′ |
| CVW Swift Z | Not Measured |
These figures look very deceiving. Even though I could get 350m / 1,148′ the signal wasn’t at all stable and it starts to breal up and have issues after around 30-40m as i previously mentioned.
Once the wireless signal dropped it reappeared automatically on the Atom A5 that was set to RX and also on the Vaxis Vision app once I came back into range. I didn’t need to turn anything off and then back on again.
I also wanted to see what would happen if I lost connection, so I turned the receiver off and then back on again. It took roughly 12 seconds for the receiver to re-establish a connection which was reasonably quick.
Next, I turned the transmitter off, which is more commonly what may happen when you change over a camera battery or power the camera off and then on again. This time it took around 15 seconds for the picture to re-establish.
Is it a disadvantage to having the wireless built-in?
This is a question a lot of people are bound to ask, so I’ll address it from my perspective. No, I don’t think it is a disadvantage having it built-in, and here is why. The in-built RX doesn’t really make the monitor that much bigger.
Price

The retail price for a single Atom A5 is $519 USD.
So how does that price compare to the competition?
The Vaxis Atom A5 is more expensive than the competing products it is up against.
Thoughts

The Vaxis Atom A5 is a big improvement over the A5H, and despite having some flaws it is a solid budget wireless video solution that won’t break the bank. The screen quality is pretty good and the operating system is straightforward and intuitive to use. The build quality is also very good compared to competing products.
It is nice that you can just use the Atom A5 as a stand-alone monitor when you don’t need the wireless capabilities. The Atom A5 allows you to have a decent onboard camera monitoring solution with the added ability to be able to transmit or receive wireless video that you can view on a free app via a smartphone. This keeps costs down.
The Vaxis Vision App is still the Achilles Heel of this product. It really needs a serious overhaul.
I know I have said this before, but at the end of the day, a monitor or an EVF is how we judge everything we shoot. Why on earth would you not want to use the best possible option you can afford. A good chef isn’t going to buy an expensive oven and then throw a frozen pizza in there and expect it to taste like a freshly made one using quality ingredients. Do you really want to use the equivalent of a frozen pizza as your sole monitoring option?
With monitors, you usually pay for what you get, and if you want a really good monitor then it won’t come cheap. If you don’t want to spend a lot of money then you have to expect that compromises will have been made.
The Atom A5 is a big improvement over the previous A5H and Vaxis has certainly delivered a much better product. The Atom A5 does face stiff competition from the Shimbol ZO600M, but it does have better build quality and operating range.


