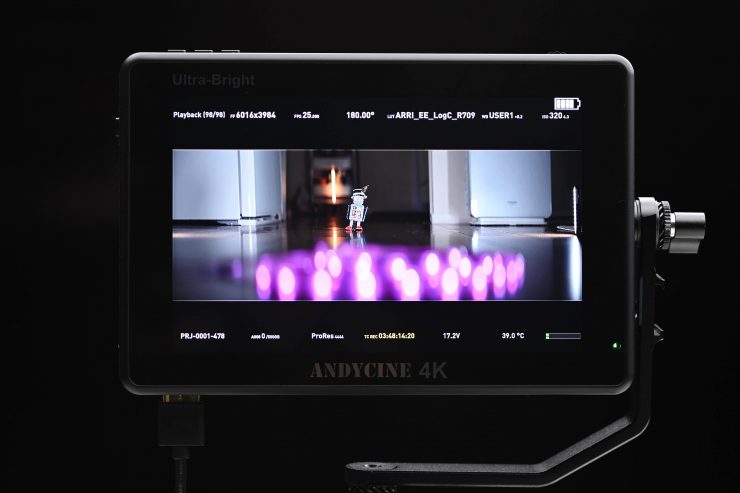
The AndyCine C7 7″ Full HD HDMI Ultra-Bright Touchscreen Monitor is touted as being a budget-friendly, daylight viewable on-camera solution.
There are so many budget 7″ monitors on the market and choosing which one to get is a bit of a crapshoot. What a lot of people don’t know is that there is very little difference with the actual panel being used on all of these monitors, as there is only a handful of manufacturers in the world who make them. So when choosing a budget monitor you should look more closely at the operating system, build-quality, after-sales service, and general usability. Don’t get me wrong, image quality is also important, but with budget monitors, a lot of them are going to look quite similar.
Key features
- 7″ touchscreen with tap and swipe controls
- Ultra-bright 2200 cd/m² screen
- Load 3D LUTs via an SD card
- Multiple imaging tools include waveform, vectorscope, histogram, and audio level displays
- Built-in light sensor that automatically dims the screen brightness according to the ambient light
- HDMI input and output with support for up to DCI 4K24 and UHD 4K30 video
Who is AndyCine?

AndyCine is a Chinese company based out of Shenzen and they have been around for a few years now. They seem to have a reasonably good reputation based on comments I have read from people who have bought their products previously. I have never reviewed an AndyCine product before, but as always, every product no matter who it comes from gets the same balanced and unbiased treatment.
According to AndyCine’s About Us page,
They a leading global online wholesale supplier of electronic related products especially in video and photography. and PC Monitor. Their commitment is to provide a wide range of high quality, trendy fashion products at stunning factory direct prices along with a class-leading customer service experience to our worldwide community of customers. Their target is to provide their global customers with high-quality products at competitively low factory-direct prices.
Those are their words, not mine.
What do you get?

AnyCine gives you the following:
- C7 7″ HDMI Ultra-Bright Touchscreen Monitor & L-Series Plate
- HDMI Type A to Mini-HDMI Cable
- HDMI Type A to Micro-HDMI Cable
- Tilt Arm
- Case
- Instruction Manual
- Cleaning Cloth
- Limited 1-Year Warranty
Screen

The screen is a 7″ 1920×1080 (8+2 FRC) IPS LCD panel. According to AndyCine it has 2200 cd/m2 of brightness, a contrast ratio of 1200:1, and a PPI of 323.

You can change the Kelvin color temperature of the screen as well as other parameters. More on the screen further down in the review.
Design
The monitor features a pretty basic design. The inputs and outputs are all on the bottom of the monitor, there are two battery plates on the back, and a series of buttons on the top.

There is nothing overly unique or special about the design of the monitor. Personally I don’t like the large ANYCINE 4K or Ultra-Bright labeling on the front of the monitor.
Build Quality
The build quality is fairly average and it does feel very plasticky. The buttons don’t inspire any confidence, and the HDMI ports are not countersunk which is dangerous as they face straight down. The buttons are also quite noisy when you press them. If you shake the monitor quite gently you can hear the top buttons and dials moving around.
The on/off button is on the right-hand side, but the label for it is on the back of the monitor.
Look, the build quality isn’t the greatest, but that doesn’t necessarily mean that you will run into any issues. You just need to know what to expect if you buy one of these monitors. If you compare the build quality of this monitor to a SmallHD, or even some Atomos models, it isn’t nearly as good.
Weight

The AndyCine 7″ monitor weighs in at 1.01 lb / 460 g. As a comparison, something like the SmallHD Cine 7 tips the scales at 567 g (20 oz).

The monitor does have a bit of weight to it, and if you are using it with a hybrid mirrorless or small digital cinema camera then you may find that an issue. I personally think a 7″ monitor is too big for a hybrid mirrorless or DSLR. A 7″ monitor is much better suited to a mid-sized or larger digital cinema camera.
Mounting Points
AndyCine has put 1/4 20″ mounting points on the bottom, and both sides of the monitor. There aren’t any mounting points on the top.
The mounting holes are made well and you can attach monitor arms or other mounting solutions without anything wobbling around or moving when it shouldn’t.
The included monitor bracket is reasonably good. It uses a type of ratchet mechanism so you do get some friction when making adjustments.
Boot Up Time
The monitor takes around 7 seconds to boot up and display an image once you press the on button.
Inputs/Outputs
The monitor has an HDMI Type A Input and an HDMI Type A Output. You can loop signals through if need be.

As I mentioned earlier, the input and outputs are located on the bottom of the monitor. The HDMI In and Out are not countersunk so there is no protection.
On the bottom of the monitor, you will also see two strange indents with holes that are covered up. This is where the SDI ports would go if you bought a different version of the monitor. AndyCine has obviously just made the same casing for both models and they just cut out the plastic covers that cover the holes out for the SDI/HDMI version.
There is a 3.5mm headphone jack on the right-hand side of the monitor.
On the left-hand side of the monitor, there is an SD card slot.
Viewing Assist Tools
The monitor has quite an extensive array of monitoring assist tools:
- Anamorphic De-Squeeze
- Blue Only
- Color Temperature Selection
- False Color
- Focus Peaking
- Histogram
- Image Flip
- Marker Color
- Pixel-to-Pixel Zoom
- RGB Parade
- Vectorscope
- Waveform
- Zebra
- Freeze
- Audio Meters
The majority of these tools can be adjusted and customized. It is good to see items such as a waveform and a vectorscope on this monitor.
With focus peaking, you can adjust the color as well as the intensity.
I like having False Color, however, there are two different versions of False Color and they include reference scales. The only trouble with the false color indicators is you have no idea what camera it is based on. Every camera’s false color scale is different and not knowing which particular camera this is based on makes it more of a ballpark guide rather than anything definitive.
I am not sure why some other companies don’t label false color with levels, so you know exactly what you are looking at.
With zebras, you can adjust them from 0-100%. This is nice because you can set the exact level for middle grey on your camera and use that to get accurate expose.

It is also nice that you can bring up one page that shows a range of scopes.
There is also a function called Freeze. Basically, if you set up a shot and then you go into the menu and turn Freeze on it will keep displaying that exact shot until you tun it off.
Another nice feature is that you can have as many monitoring tools selected at once as you like.
Operating System
The operating system of the monitor uses a combination of buttons, a scroll wheel, and touch screen functionality. This allows you to use the monitor completely via touchscreen operation, or through the use of buttons. It is nice to have both options because if you are using the monitor in cold conditions you may have gloves on and touchscreen is then not always the easiest to use.

You shouldn’t confuse the touchscreen functionality with the same sort of way it works on a SmallHD or an Atomos. On the AndyCine C7 the touchscreen operation isn’t implemented nearly as well. In saying that, it is still pretty good for a budget monitor.
The monitor does have pinch to zoom. The pinch to zoom does work and you can drag the position around on the screen, however, it didn’t always work, and on occasion, I would have to do it more than once to get it to work.
You can also assign quite a few presets by dragging your finger up from the bottom of the screen. Here you can set your most commonly used functions so you can access them quickly when need be. If you double-tap on any of the tabs you can change what they do.
To bring up the main menu you can double-tap on the screen. However, I did also find that like some Atomos monitors, I had to continually double-tap the screen to try and bring up the menu. It wasn’t always as responsive as I would like.
Having used SmallHD’s fantastic Page OS system over the last few years it is very hard to go back to anything else. In saying that, AndyCine has a pretty good job with the operating system and it is better than most other monitors in this price range.
3D LUTs
You can load up 3D LUT via the SD card slot. The monitor also has 4 pre-set onboard LUTs.
On the monitor I was testing these were the preset LUTs:
Power
The monitor draws 20W and it can take an input voltage of 7-24V. It utilizes dual Sony NP battery plates. Batteries can be hot-swapped on the monitor.

The batteries don’t move around or wobble on the battery plates, but they are a little difficult to put on take off. The battery release button doesn’t inspire confidence.

There is a 12V DC In as well as an 8.4V DC out for powering certain accessories.
Is it quiet?

There is nothing worse than a monitor that has a very noisy fan. Some of the Atomos offerings sound like there is a mini hairdryer being used in the same room. The AndyCine is relatively quiet and the two fans are barely audible. You will not pick up any fan noise if you have this mounted on your camera.
How is the image?

Image quality and usability are at least to me, the two biggest boxes that need to be ticked with any monitor that is going to be used in a professional environment.
As far as the image quality is concerned it is reasonably good. The screen is nice and bright and sharp, although the colors look slightly overly saturated. While you can adjust the parameters of the image such as contrast, saturation, hue, and sharpness, you can’t adjust any of them below zero.
The images appear almost too sharp for my personal taste, however, I think most people would be happy with it. It is hard in a review to show you screen quality. You really need to see a screen yourself to be able to judge quality.
The screen only covers 100% of Rec.709, it doesn’t cover DCI-P3, nor will it cover Rec.2020, etc. Strangely the monitor does have HDR settings that include HLG P3, HLG.2020, and HLG.709. I’m not sure what good these modes would be given the monitor only covers a Rec.709 Color Gamut. They are really more like simulated views of what HDR would look like.
The light sensor that detects ambient light levels and automatically adjusts the screen for optimal brightness is a little bit of a double-edged sword. While it does certainly work, if you place your hand in front of the monitor to press one of the preset buttons, the monitor starts to darken because it thinks the environment you are in is getting darker. This is just something you need to keep in mind when you are using it. You can, however, change the Backlight light sensor to Manual instead of Auto.
Is it actually 2000 nits?

I tested the monitor by shooting a white card and exposing it at 100 IRE on a waveform. I then played back that clip and measured the brightness using a Sekonic C-800. The AndyCine C7 monitor had the backlight set to manual and the backlight brightness at 100. It recorded a brightness level of 2348 lux, which exceeded the claimed figure of 2200.

How does that figure compare to similarly priced monitors such as the pnbe 7″ 2000 NIT HDR Monitor that I recently reviewed? I measured the pnbe monitor with the backlight set to high, the brightness at 100, and the gamma set to 1.6. As you can see the monitor recorded a brightness level of 2030 lux, which slightly exceeded the claimed figure of 2000. The trouble with the pnbe monitor is that when you turned the brightness up to achieve 2000 nits it became all milky and unusable,

So how does it compare to a SmallHD Cine 7? Above you can see that the Cine 7 had a brightness of 2280 lux.

As far as color accuracy is concerned (the monitor’s Kelvin color temperature was set at 6500K), the AndyCine C7 recorded 6439K. This was a very good result.

As a comparison, above you can see the result I got when I recently tested the pnbe 7″ 2000 NIT HDR Monitor.
The brightness of the AndyCine C7 is impressive and unlike some other ‘affordable’ high-bright monitors the image doesn’t look washed out when the brightness is at its maximum level.
Usability
As I just mentioned the operating system and the way the touchscreen functionality works could be a little better, but I’m not going to complain too much because this is a sub $300 USD monitor.

With monitors, you need to be able to access assist tools quickly. With the AndyCine C7 this is possible to do and I think most potential users will be happy with the way it works.
The monitor is easy to mount, but I don’t like that the HDMI connectors are not countersunk. When you have these ports on the bottom of the monitor you get forced to place the monitor in certain positions when it is on a camera so the HDMI cable doesn’t ens up hitting something.
How does it compare to the pnbe 7″ 2000nit HDR Monitor?

The pbne 7″ 2000 nit monitor was one that I recently tested, and as it falls in the same sort of price range as the AndyCine I thought I would compare the two.
To maintain a fair playing field I output the exact same image from the Kinefinity Mavo LF to both monitors. That way I could see exactly how each image appeared.
In their default configurations, the AndyCine looked a lot better. It had richer blacks, better color accuracy. The AndyCine also appaered to be brighter. On the pnbe, the blacks were more elevated and the colors were a little skewed towards green.

The pnbe has no way of adjusting the backlight and that gives the AndyCine quite an advantage. Above you can see that the only way of increasing the brightness on the pnbe is too turn up the actual brightness setting which results in a washed to and unusable image.
The AndyCine also has a far better operating system and it is touchscreen, however, the build quality of the pnbe is a lot better than that of the AndyCine.
Price & Availability

The AndyCine C7 7″ Full HD HDMI Ultra-Bright Touchscreen Monitor retails for $269.99 USD. You can also get a version that has both SDI and HDMI In and Out for $369.99 USD.
You can also purchase the AnyCine C7 at these following retailers:
Andycine official store:
https://www.andycine.com/andycine-c7-7-inch-field-monitor-p2655546.html
Amazon store:
US: https://www.amazon.com/dp/B087LW4QRL?ref=myi_title_dp
UK: http://www.amazon.co.uk/dp/B087R9R49P
JP:http://www.amazon.co.jp/dp/B087QBSNXN?ref=myi_title_dp
Competition
There are not actually that many other 7″ Ultra-Bright monitors that have touchscreen functionality (particularly in this price range), however, I will list monitors that have similar brightness (2000 nits and above) and size:
Please note, some of these monitors have both SDI and HDMI In and Out.
Now, how do a lot of other monitors that are similarly priced actually compare to the AndyCine C7 on paper?
| NITS | HDMI | SDI | POWER DRAW | WEIGHT | PRICE | |
| AndyCine C7 | 2200 | In/Out | No | 20W | 460g | $269.99 USD |
| pnbe 7″ 2000nit HDR | 2000 | In/Out | In/Out | 16W | 360g | $229 USD |
| ikan Saga S7P 7″ Super High-Bright | 2000 | In/Out | In/Out | NA | 680g | $499.99 USD |
| FeelWorld 7″ 4K Ultra-Bright (HDMI Only) | 2200 | In/Out | No | 18W | 370g | $259 USD |
| FeelWorld 7″ 4K Ultra-Bright |
2200 | In/Out | In/Out | 18W | 395g | $339 USD |
| FeelWorld 7″ 2200 cd/m² (HDMI Only) |
2200 | In/Out | No | 20W | 500g | $299 USD |
| FeelWorld 7″ 2200 cd/m² |
2200 | In/Out | In/Out | 20W | 500g | $399 USD |
| FeelWorld LUT7 7″ | 2200 | In/Out | No | 20W | 460g | $249 USD |
Conclusion

The AndyCine C7 is a pretty good monitor. It is bright, sharp, and the colors it displays are reasonably accurate (although maybe slightly oversaturated). The operating system and touchscreen functionality could be better, but for a monitor in this price range, they are better than most of the competition.
The build quality is ordinary and the buttons and dials could be better made.
In saying that it is very hard to fault a monitor at this price and I don’t want to sound overly critical, because at $269.99 USD it offers pretty good value for money, especially if you are after a high-bright 7″ monitor that also has touch screen functionality.
At the end of the day, in a lot of cases, you end up paying for what you get. Nobody should be buying a sub $300 USD 7″ high-bright monitor and expect that it will be as well built or as good as say a Small HD Cine 7. There will always be compromises that have to be made if you don’t want to spend a lot of money.
AndyCine has done a pretty good job with the C7 and I think anyone who will be looking at a sub $300 USD monitor like this would be reasonably happy if they purchased it. The touchscreen functionality is what makes it stand out from other monitors in this category.
Like what we do and want to support Newsshooter? Consider becoming a Patreon supporter and help us to continue being the best source of news and reviews for professional tools for the independent filmmaker.


