
Google Drive is an incredibly powerful tool for storing and organizing all kinds of data. Best of all, it’s available for free (at least for beginners) with a Google account. Also, because Drive stores all your files in the cloud, it offers some significant advantages over hiding them locally on your phone or computer. Drive works with virtually any device connected to the Internet, making it easy to use at home, at school, at the office, and everywhere in between.
However, if you’re new to Drive, there are some important basics you should know before moving all your data and files. So here’s a quick overview that covers the top things about Google’s popular cloud storage service
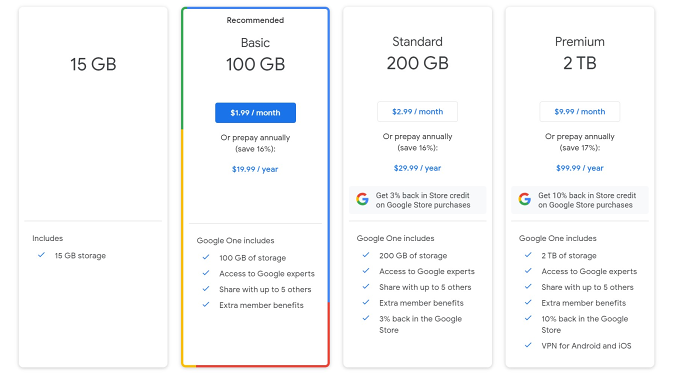
Storage and price
Every Google Drive user gets 15GB of free storage However, any data you store in Google Photos also counts against this limit. So if you use it to backup your photos, you might not have much space left for your documents and files. However, you can increase your drive storage space with a file Google One-SubscriptionThat starts at $1.99 per month (or $20 per year) for 100GB of storage and goes up to $9.99 for 2TB (or $100 per year).
Sam Rutherford / Engadget
For most people, 100GB is enough space to store important files, work documents, and family photos. However, if you plan to use the drive as a way to back up all your data, you’ll probably want to go with a larger plan. The nice thing is that while the $20/year basic plan is relatively cheap, there are plenty of ways to get extra storage for free, at least temporarily. For example, someone who buys a new Chromebook You get 100 GB drive storage for free for one yearAlthough new Google One subscribers can get offers to try the service with them One month free subscription.
So, before you start uploading all your files, you should know how much storage space you need and how much it will (or may not) cost you.
Upload, file support and organization
Once you know how much storage you need, you can start uploading or moving your files to Google Drive For individual files or data stored locally on your device, you can simply click the New button and select the option to upload a file or folder. On a PC, you can drag and drop files into the browser window while on the Drive website Drive supports a variety of file types, including the most popular formats such as .JPGs, .PNGs, .GIFs, .MP3s, and more. For a complete list of supported file types, see the official Google Help Here.
After all your files are uploaded, you can manage them locally on your phone or PC. You can create nested folders and drag and drop files from one location to another. Of course, you can search for a specific file or folder by typing in the search box, although it’s important to remember that if you store a lot of files on the drive, it may take longer to locate (especially if your Internet connection is not very fast). ). So if you can create a simple directory with folders for important projects or datasets on day one, you’ll probably save yourself a lot of time and headaches later.

Sam Rutherford / Engadget
It’s also important to note that while you can create Google Docs, Sheets, Slides, etc. directly in Drive on PC, on mobile you’ll need to separately install both Drive and the specific productivity software you want to use. This is because when they all work together, they are considered separate applications.
Another great way to organize your work with Google Drive is to save different project forms in Docs This allows you to start writing text or create forms without having to start from scratch each time. You can also save templates for things like bibliographies, which can save students time when trying to cite sources for a research paper.
Alternatively, instead of using a dedicated app, you can share a Google spreadsheet with your roommates to see utility costs and other shared expenses. And while not designed exclusively for it, students have found that when places like schools block or restrict common messaging apps, you can still use Google Docs to chat with friends. All you have to do is invite people to a blank document and then use real-time collaboration to talk and reply to each other. After that, you can simply delete the document or keep it for another day.
cooperation
Aside from the simple and easy-to-use design of cloud storage, one of Google Drive’s strongest features is its suite of collaboration tools. Sharing a file or document with another person is as easy as clicking the Share button and entering their email address Alternatively, Drive can generate a link to send via text message, social media or your preferred messaging app. As someone arrives, you can view or edit the file with them in real time.
However, it’s important to know who you’re sharing your files with and how they’re using them For example, allowing a teacher or mentor to edit can be very helpful if you’re looking for help with an article, but less so if you’re sharing an eBook with a friend. In addition to the file owner, Drive offers three different access levels: viewer, commenter, and editor. And if something goes wrong and you ever want to see an older version of a Google Doc, Sheet, or Slide, you can open the File menu and select the Version History option.

Sam Rutherford / Engadget
Visitors can only view and read the document, but do not have the ability to modify the content Commenters can use Google’s commenting tool to view and highlight ideas and questions about content, while editors can edit like the document owner.
If you want to see files that others have sent you recently, you can click the Shared with me tab in Google Drive And if you have a Google Workspace account through school or work, you can open a simple activity dashboard by clicking the squiggly icon. (It’s in the top-right corner of the desktop, next to the blue “Share” button.) Finally, if you want to quickly see which files you’ve shared with others, you can type “to:” in the Drive search box.
Access files offline
Although Google Drive is primarily intended for managing documents and files stored in the cloud, it supports offline access, which can come in handy if you don’t have a good internet connection. However, there are a few steps you need to take before you can take full advantage of using Google Drive offline.

Sam Rutherford / Engadget
First you need to make some changes to your drive settings while you are online before On a PC, you’ll need to click the gear icon in the top-right corner of the Google Drive browser tab, click Settings, and then check the box next to the Offline menu option. On mobile, you need to open the Drive app, locate a specific file and then set it for offline access by enabling the option via the “More” icon (which looks like three vertical dots). Once you’ve done this, you can access, edit and save any changes you’ve made And the next time your device connects to the Internet, it automatically syncs any changes you make to the offline document to the document stored in the cloud. In the meantime, all you need to do on your Chromebook is open your Google Drive settings, scroll down, check the box next to the Offline option, and click Done.
All Engadget affiliated products are selected by our editorial team, independent of the parent company. Some of our stories contain affiliate links. If you purchase something through one of these links, we may receive an affiliate commission.


