Finally we got our hands on a RED KOMODO 6K camera – thanks to AV Professional in Vienna, one of Austria’s premier rental places, who loaned it to us. Interested to see how the baby dragon fares in our lab test? Read on …
For quite a while I was eager to get my hands on a RED KOMODO 6K camera, as it features a 6K, slightly larger than Super 35 global shutter sensor, with a claimed 16+ stops of dynamic range according to the manufacturer.
Supported by AV Professional Vienna
When our good friends at AV Professional, an audio and video equipment rental house in Vienna told us they could give us a loaner unit we immediately jumped at the opportunity, thank you! They have very good coffee too …

KOMODO – a Global Shutter Camera
A global shutter sensor with no sacrifice in dynamice range sounds like a very bold claim, and is a really unique offering in the cinema camera landscape for now with the small form factor it features.
Normally, we would start the lab test with the rolling shutter measurements, but in this case there is no rolling shutter – the global shutter sensor manages to read out all lines at once. Just for fun I tested this with out 300Hz strobe light and yes, no rolling shutter visible.
In the impressive list of specs this is probably the biggest feature of the RED KOMODO, as the global shutter renders a very natural feel with handheld footage- like the way film cameras rendered motion in the days of celluloid.
Setup of the RED KOMODO 6K
Before doing the dynamic range and latitude test with the RED KOMODO, we did a sensor calibration after approx. 10mins of runtime. Firmware version was 1.3.1 at the time of testing.

If you are curious how we test dynamic range, please head over here.
ISO influence – next thing was to establish the influence of ISO on the recorded images – there is no hint from RED what the base or native ISO of the sensor is. With REDCODE RAW (R3D) you can change ISO in post, but for ProRes 422 this option is not available. What was easy to see is that the respective ISO setting in camera would just change were the code values would sit on the waveform monitor (higher ISO -> higher luma values -> brighter picture), but not influence clipping in the image. E.g. a clipped first patch of the XYLA21 stepchart would stay clipped no matter what ISO was used, and the second patch would stay below clipping in the same way.
Hence, we settled on ISO800 for our tests below.
Dynamic Range of the RED KOMODO 6K ISO800 ProRes 422 HQ
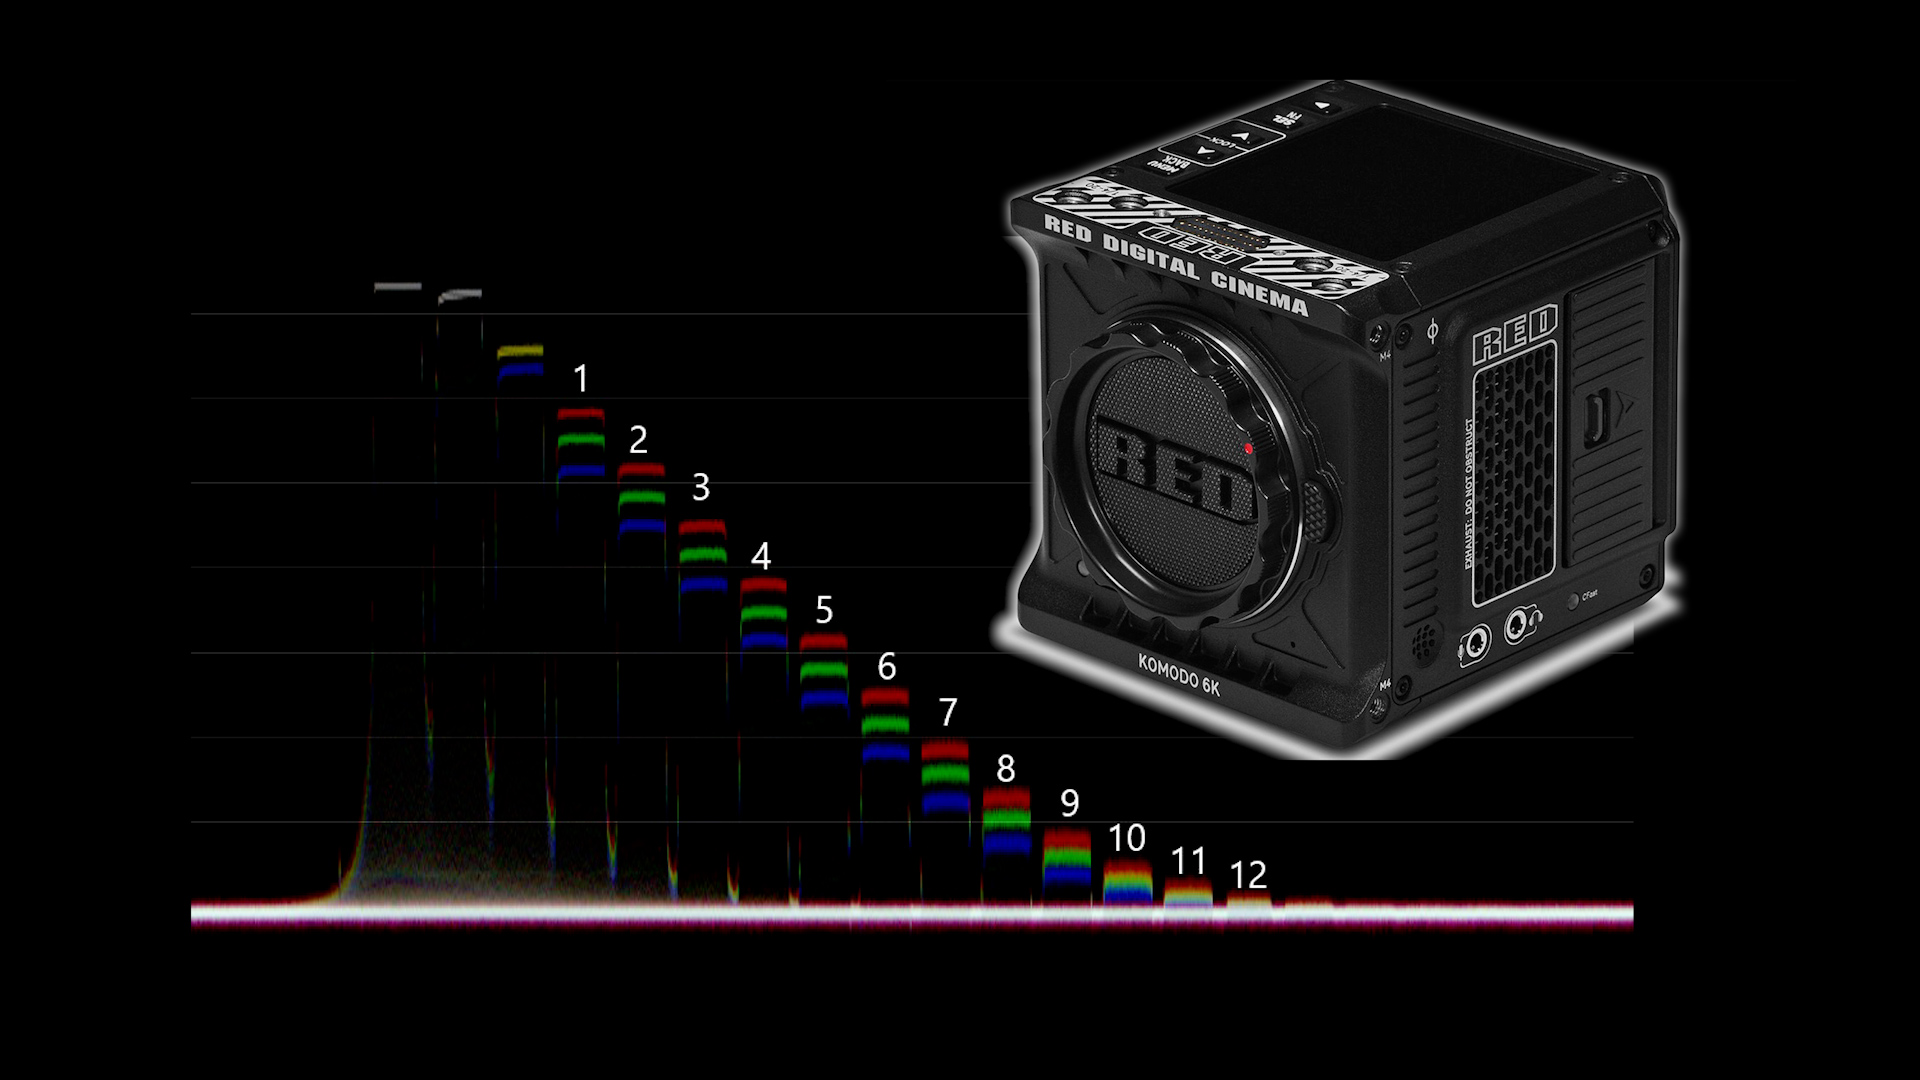
In ProRes 422 HQ, the 6K sensor is downsampled to 4k DCI (4096×2160). Shooting the Xyla21 stepchart reveals an interesting phenomenon, which only shows if we look at an RGB waveform plot:

As you can see above, if we go down from the clipped first patch on the left side, the next patch shows no RGB information (but is not clipped as it can be moved around by adjusting the shutter / lens aperture) – it is just grey, thus indicating clipped color channels. Only the next, third patch further down shows a yellow and a blue color – indicating a clipped red and green color channel. The first patch which is not clipped and has full RGB information is the fourth one, labelled with “1”.
In-built highlight recovery – this phenomenon for the ProRes files hints at an in-built “highlight recovery” algorithm in my opinion.
It seems to work like this: the luma value of a pixel is calculated by adding the individual R, G and B values with a given formula: Y = 0.299R + 0.587G + 0.114B. Typically the red channel will clip first, then the green and lastly the blue channel (blue lies more than a stop below the red channel as can be seen in the RGB waveform above).
Using the luma formula above, clever highlight recovery algorithms can estimate the amount of luma by using the non-clipped information of the blue and / or the green channel to reconstruct a quasi “non-clipped” signal even though one or two color channels have clipped already. You can see this estimation at work by a slight unevenness (larger gap) between the third and fourth patch from the left.
By this reconstruction, the second and third patch from the left lack color information (as we will also see further down in the latitude test). Hence, we can only count the fourth patch from the left with full color information as the first usable stop (labelled as “1”).
Therefore, from the RGB waveform plot we can deduct 12 usable stops above the noise floor.
Independent from the considerations above, IMATEST calculates 12.2 stops of dynamic range at a signal to noise ratio = 2, 13.5 at SNR = 1 for ProRes 422 HQ:

I had a look at all the previous waveforms of the various cameras that were tested, and no camera so far had this in-built highlight recovery. Here is an example of the BMPCC6K in ProRes 422 HQ:

The second stop from the left has the red channel clipped, hence we can only start to count the 3rd patch from the left as the first usable stop – as we did in our lab test of the BMPCC6K here. We get to the same 12 stops of dynamic range by the way. Shooting in BRAW on the BMPCC6K gives you the option in post (in DaVinci Resolve) to do a highlight recovery.
Dynamic Range of the RED KOMODO 6K ISO800 REDCODE RAW HQ
A very similar phenomena (highlight recovery) is seen in the 6K (6144×3240) R3D HQ files looking at the RGB Waveform:

Although the R3D HQ files are much noisier than the ProRes files, there are still about 12 stops visible in the waveform plot above the noise floor.
IMATEST calculates 10.8 stops at SNR = 2 and 12.3 stops of dynamic range at SNR = 1:

It becomes clear, that quite some signal processing including some kind of noise filtering is happening in the ProRes 422 HQ files when comparing them to the R3D HQ RAW files.
I have noticed this behaviour in several other cameras as well – RAW is always more noisy than ProRes, indicating some noise filtering in ProRes – the exception being the Blackmagic BMPCC6K camera (showing 11.8 stops with BRAW in 6K and 11.9 stops with ProRes 422 HQ in 4K).
Those dynamic range results are rather good for a global shutter camera, especially in ProRes 422 HQ out of the box.
Latitude Test of the RED KOMODO 6K
Latitude is the capability of a camera to retain colors and detail when over- or underexposed and brought back to the base exposure level.
In our studio scene, we are lighting our subject (in this case my colleague Johnnie) in such a way that the face luma value falls at max. 60%. This gives a base exposure of f4 at 360° shutter angle at ISO800 (or f2.8 at 180°).
In the past we then successively underexposed the scene by reducing the shutter angle and brought the images back to the same base exposure.
Based on multiple requests by our dear readers we have now expanded this test to include overexposure as well.
Hence, here is our base studio scene, exposed such that Johnnie’s face shows a max. luma value of 60% (before grading), and then lightly graded:

From this value, we open up the iris of the lens stop by stop until Johnnie’s face shows clipping. Also, we underexpose the base scene by stopping down the lens /or increasing the shutter angle from 360° to 180°, 90°, 45°, 22.5° and 11.25°.
The latitude test was done both in 4K DCI ProRes 422 HQ and in REDCODE RAW 6K HQ (R3D) at ISO800 to see if there are differences.
Then, in DaVinci Resolve (version 17 public beta 6) we bring back the images to the base exposure value by matching the waveform plots as closely as possible.
Overexposure
As shown already in the RGB waveform in the dynamic range measurement section above, there is only one stop (labelled as “1”) above the 60% luma value which still contains all the RGB color channel information without clipping, the next stop above has already a clipping red channel. The in-built highlight recovery cannot recover Johnnie’s skin, as seen below:

Exactly the same phenomena is seen in the R3D files (not shown here). For both ProRes and R3D the one stop over file is fine.
Underexposure
Things get interesting at 5 stops underexposure, brought back to the base exposure (for REDCODE RAW this is quite simple by adjusting the exposure slider in the RAW tab in DaVinci Resolve. For ProRes 422 HQ, the lift, gamma and gain controls were used).
Surprisingly, ProRes 422 HQ behaves better in the underexposure test than REDCODE RAW 6K, see the two images below:


REDCODE RAW shows a very greenish tint and is noisier, ProRes 422 HQ retains the colors in a much better way. Both files show noise, but it is a very fine, grainy noise which can be removed easily by noise reduction in post (if needed).
At 6 stops underexposure, pushed back things get really interesting and the limits are reached. Please have a look again at both the ProRes 422 HQ and R3D HQ files below:


Again, ProRes 422 HQ retains colors better than the R3D HQ file. Noise in both images has gotten to a point where additional noise reduction has to be used in post. The ProRes 422 HQ files still clean up nicely, but vertical stripes appear in the image. Also, looking at Johnnie’s shirt, larger blotches of chroma noise artefacts become visible which cannot be removed effectively. Please have a look below:

Again the R3D HQ RAW files show even more noise, and I find it very difficult to remove the noise effectively in post without sacrificing detail (using temporal and spatial noise reduction in DaVinci Resolve):

In my opinion the R3D HQ 6 stops under file is at the cusp of being usable, the ProRes 422 HQ file is a tad better. But certainly, the limits of recovery have been reached.
Just for the records, here is a 7 stops underexposed image, pushed back to base exposure without noise reduction in R3D HQ:

Latitude summary
In summary, about 7 stops of latitude are available with the RED KOMODO 6K (one above, 6 under). This is a tad worse than the BMPCC6K which can cope with almost 4 stops of overexposure and 4 stops of underexposure from our base exposure scene. Also, again it can be seen that those cameras distribute the stops very differently.
Working with the 6K REDCODE RAW R3D HQ files in Resolve
I am currently testing the new NVIDIA RTX3090 on our newly built rig (Ryzen 3900x, 32GB RAM, 1TB SSD). The card is on loan from NVIDIA, a big shout out to them! Working with the RTX3090 in Resolve is a breeze.
Just a quick benchmark: without noise reduction, in a 3840×2160 timeline I have buttery smooth playback at 20% GPU load (5.1 GB memory usage) with the 6K R3D HQ RAW files. The playback drops from the target 25fps to 23 fps if I add noise reduction: temporal (3 frames faster / small) threshold 40, spatial (faster / medium) threshold 18 – GPU load increases to 75%, memory usage to 6 GB.
I will do a separate article on this subject once I have collected footage from various cameras in the next few months.
Summary
Looking at the dynamic range results, the RED KOMODO 6K is at a similar level than the BMPCC6K. Slightly higher in ProRes 422 HQ, worse in R3D HQ compared to BRAW 3:1 (for the BMPCC6K).
The latitude test of the RED KOMODO 6K shows about 7 stops of latitude, which is a very good result – similar to the full frame Sony a7S III for example, see our lab test here. The other two S35 sensor cameras which we tested recently, both the BMPCC6K and the Canon C300 MK III manage almost 8 stops of exposure latitude. Examples for full frame cameras that manage almost 8 stops of exposure latitude are the Panasonic S5 (lab test here) and Canon C500 MK II (lab test here).
All in all, a strong showing by the RED KOMODO 6K, considering its unique technology of featuring a global shutter sensor!
Have you used the RED KOMODO 6K already? What are your experiences so far? Please let us know in the comments below.


